QUICK START GUIDE
Below is a summary of steps to follow each time a Limited-Use Public Health Emergency VeraSuitTM encapsulating coverall is worn.
1. For professional health care worker use only.
2. Inspect all parts before use.
3. Only use with verified VeraSuitTM hardware, shown above, including a helmet, cooling undershirt, fan, and fully charged battery.
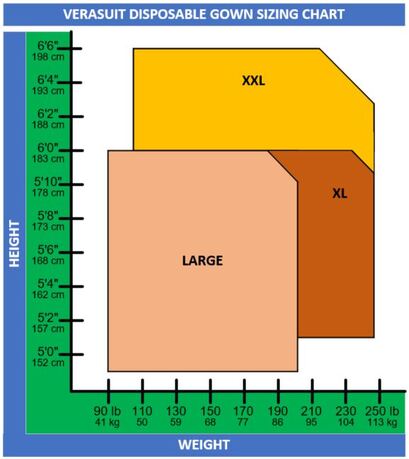
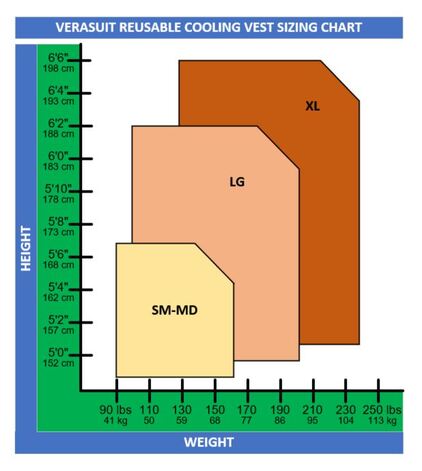
4. See disposable sizing guide and undershirt sizing guide. Gowns expire as indicated on the tag.
5. Confirm that the battery is fully charged with all five charge lights illuminated. Never use a battery with less than all five lights charged. The battery lasts about eight hours with a full charge. A fully closed coverall is a suffocation risk without a working fan.
6. Find a donning partner. Donning requires a partner.
7. Watch the donning video.
8. Before use, it is mandatory to practice donning and doffing the apparel at least two to three times, or until the wearer is comfortable with donning and doffing the apparel.
Below is a summary of steps to follow each time a Limited-Use Public Health Emergency VeraSuitTM encapsulating coverall is worn.
1. For professional health care worker use only.
2. Inspect all parts before use.
3. Only use with verified VeraSuitTM hardware, shown above, including a helmet, cooling undershirt, fan, and fully charged battery.
4. See disposable sizing guide and undershirt sizing guide. Gowns expire as indicated on the tag.
5. Confirm that the battery is fully charged with all five charge lights illuminated. Never use a battery with less than all five lights charged. The battery lasts about eight hours with a full charge. A fully closed coverall is a suffocation risk without a working fan.
6. Find a donning partner. Donning requires a partner.
7. Watch the donning video.
8. Before use, it is mandatory to practice donning and doffing the apparel at least two to three times, or until the wearer is comfortable with donning and doffing the apparel.
DONNING PROCEDURE
1. Wash hands before starting.
2. Donning requires a partner. Find a donning partner.
3. Lay the gown, face down, on a table or over a chair.
4. Remove any protective liners from the face shield.
5. Size the helmet on wearer’s head. Tie long hair in a high bun that rests above the headband ratchet. Never let long hair hang down.
6. Remove the helmet and insert it into the hood. Attach the helmet to the hood by mating the three orange hook tabs on helmet to the three orange loop tabs on the inside of the hood.
7. Put on the cooling undershirt with spacers. Tuck the cooling undershirt into your pants.
8. To attach the fan to the gown, mate the orange top and bottom hook on the fan to top and bottom orange loop on the inside of the gown so that fan overlaps the square white air filter, with the fan cowl opening pointing upwards towards the head and airflow pointing upwards.
9. Connect the fan to the battery. Turn on the battery, and ensure that air is coming from the fan. Place the battery in a pant pocket.
10. Put on the gown. First, step into each bootie, pull up the pant legs, and pull the booties on.
11. Next, put the helmet on your head and confirm a snug fit. Tighten with the ratchet if needed.
12. Insert each arm fully into each sleeve.
13. Have the donning partner confirm that the fan rests against the user’s back between the middle spacer and left spacer on the back. Confirm that air is flowing from the fan. Confirm that airflow is going upwards towards the wearer’s head.
14. Have the donning partner close the back zipper. The donning partner can also optionally seal the zipper flap.
15. Tie the waist straps firmly. Keeping the waist tie loose allows more air into the legs. This is fine if one wants more air inside the encapsulating coverall, but makes the apparel more voluminous.
15. Don a set of gloves. Extend each glove to cover wrist material of the coverall.
| set_up_gown_rev_1.1.pdf |
| set_up_hardware_rev_1.1.pdf |
| donning_rev_1.1.pdf |
WHILE WEARING
A. The coveralls should pressurize and swell within minutes, providing extra internal air for breathing and cooling.
B. Exhale downward into chest area to reduce lens fogging
C. Change gloves if torn
D. If the battery connector becomes unplugged, it can be re-inserted through the coverall. Exit the contaminated work area and doff immediately if air stops entering the gown.
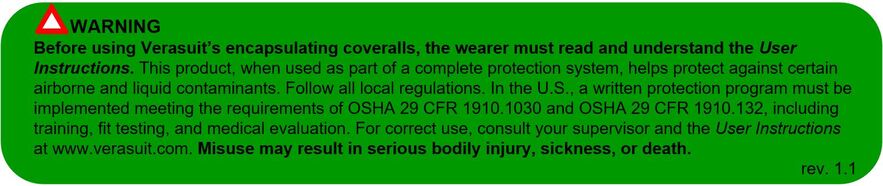
Warning: This information is based on technical data that Verasuit, LLC believes to be reliable. It is subject to revision as additional knowledge and experienced is gained. Verasuit, LLC is not responsible for all production quality of its manufacturing partners. There are uses and environments in which the gowns on this website are unsuitable. It is the responsibility of the user to review available data and verify that the product is appropriate for the intended use. Not for use for surgery, for fire protection, or any chemical applications.